ENTS: Environmental NeTworked Sensing
Getting Started for End Users
Prerequisites: An assembled ENTS board with the latest firmware.
- Open any resources that you need. During part of the ENTS configuration process, you will use your device to connect to a wifi network with no internet access.
- Keep this guide open in a window or tab.
- If you were provided with a spreadsheet containing the calibration values and other ENTS information, keep that open as well.
- If you were not provided with a logger ID on your instance of ents-backend, create a logger by logging in to your instance and navigating to your profile page's "Loggers" tab.
- When creating the Logger, use the values provided to you for the DevEUI, JoinEUI, and AppKey (also visible during step 3 of the process to find out what firmware version you have). Take note of the Logger ID after you successfully create your logger, you will use it later.
- If you were not provided with a cell ID on your instance of ents-backend, create a cell by logging in to your instance and navigating to your profile page's "Cells" tab.
- You should give your cell a memorable name. The location and coordinates can be edited later, so you can enter in placeholder values if you are not sure (or do not want to use the map functionality). Take note of the Cell ID after you successfully create your cell, you will use it later.
- After receiving your ENTS board, plug it into power. You can use a USB cable to connect the ENTS board's USB-C port to your computer or to a 5V >=500mA power supply (such as a phone charger).
- Upon bootup, the ENTS board will broadcast a WiFi hotspot named
ents-followed by its device address, which looks like 8 random letters and numbers (ex.ents-06099AEA). You can find your board's device address written on the back of the board in the white boxes. Use your phone or computer to connect to your board's WiFi network. The default password for initial configuration isilovedirt. - It is recommended to uncheck any options to "remember this network" or "automatically connect" to avoid accidentally connecting to ENTS board's WiFi in the future. You can also manually forget the network after finishing the setup process in this guide.
- While you are connected to the ENTS' WiFi network, you will not have access to the broader internet.
- After connecting to the ENTS' WiFi network, open a web browser and navigate to 192.168.4.1. This webpage is hosted locally by the ENTS board, and is used to configure the ENTS board for your use case.
- Fill out the form on the webpage. Some details may already be filled in based on previous configurations to that ENTS board. Text which has a triangle next to it can be clicked on to show help text.
- If you do not have a LoRaWAN gateway, make sure to select
WiFifor the upload method. - Click on the green
Save Configurationbutton and follow the instructions to press the whiteRSTbutton near the USB port, closest to the corner. - On your host device, close the webpage and disconnect from the ENTS' WiFi network.
- Unplug your ENTS board from its power source.
- Connect your ENTS board to the sensors that you have enabled.
- To simultaneously take voltage and current readings, use the following configuration, where R is a 2 kOhm resistor:
- Reconnect your ENTS board to a power source.
- Observe the blinking status LED near the white RST button at the corner of the board.
- It should initially be blinking slowly: searching for internet connection.
- Then it will blink quickly: connecting to internet and attempting to upload data.
- Finally it will turn off: successfully uploaded data.
- If the LED is solidly on, then it has encountered an error and has halted the program. Try power cycling the device: While the board is connected to power, press and hold the blue RST button and white RST button at the same time, then release the blue RST button before releasing the white RST button.
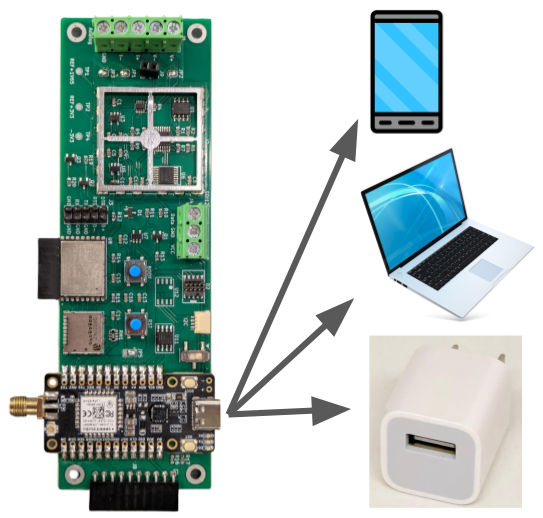
Figure 1: To power the ENTS board, use a USB cable to connect the board to a charger or a host device.
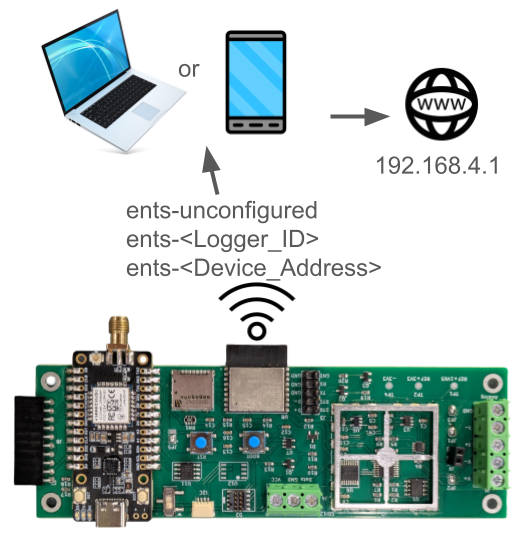
Figure 2: After powering on the ENTS board, connect to the wifi network it is broadcasting, then open a web browser to 192.168.4.1.
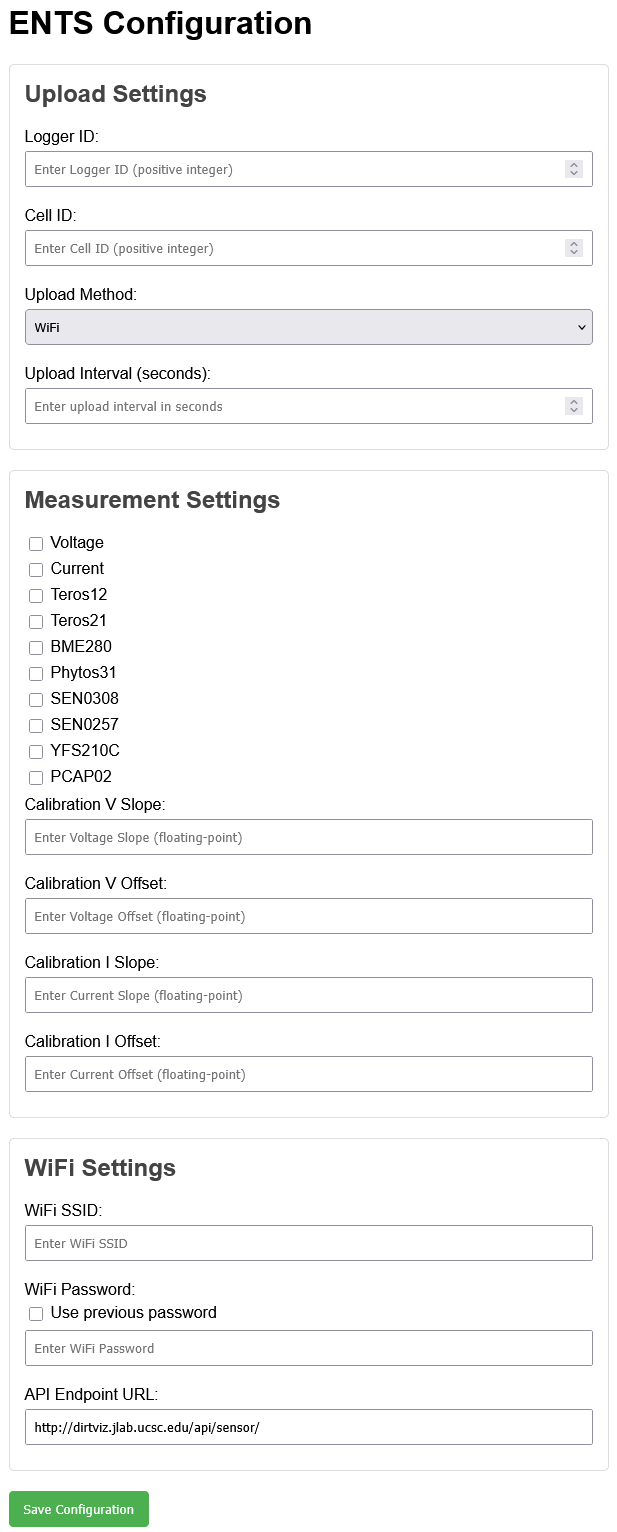
Figure 3: For a duration after booting up, the ESP32 on the ENTS board broadcasts a wifi network for the purposes of letting the user wirelessly configure the device. The webpage hosted by the ESP32 is shown here.
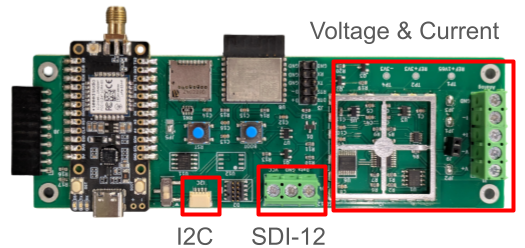
Figure 4: The I2C and SDI-12 bus is exposed at the bottom of the board through the JST header and 3 position screw terminal. Voltage and current readings can be made through the 5 position screw terminal at the right.
How to check what firmware is on your ENTS board
- You will need a serial monitor application and may need to install USB drivers in order to check your firmware.
- CoolTerm (Windows, MacOS, Linux), PuTTY (Windows),
screen(MacOS, Linux), andminicom(MacOS, Linux) are examples of commonly used desktop applicaations for opening a serial monitor. There are also a variety of serial monitor apps available for Android and iOS. - If you cannot, you may need to install drivers for your device to recognize the ENTS board’s serial chip (CP2102) as a device capable of being connected to with a serial monitor. Installation instructions are available within the zip file’s release notes text file.
- CoolTerm (Windows, MacOS, Linux), PuTTY (Windows),
- To check if you have the latest firmware, connect your ENTS board to your computer with a USB cable.
-
Open a serial monitor on the port that you just connected with 8N1 (typically the default setting) and 115200 baud.
- After connecting your serial monitor, press the white RST button near the corner of the board and observe the text on the serial monitor. There is a line that is printed near the large “ENTS” message that describes the commit ID.
- For firmware versions after commit 3031db9 (2026-01-08), the DevEUI, JoinEUI, and AppKey are provided as well.
- Compare the commit ID reported by the ENTS board against the commit ID of the latest release on the ents-firmware repository’s releases page. If they match, then you have the latest release of the firmware.