Captive Portal Configuration
During initial boot, the ENTS board's onboard ESP32 co-processor broadcasts a temporary WiFi access point. This allows field operators to configure network credentials, telemetry channels, and cloud device identifiers without connecting cables or opening a terminal.
1. Connecting to the Configuration Hotspot
- Connect the ENTS board to power via USB-C or a battery.
- Wait 5 to 10 seconds for the status LED to begin blinking.
- On your computer or mobile phone, open the available WiFi network list.
- Locate the network named
ents-followed by the 8-character device identifier (for example,ents-06099AEA). This identifier matches the MAC address printed on the white silkscreen label on the back of the PCB.
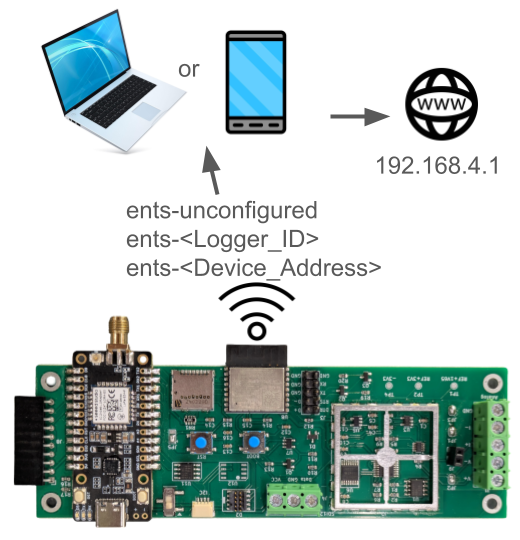
ents-XXXXXXXX) from a phone or computer.- Connect to the network. The default password is:
- Recommendation: Disable "Auto-reconnect" on this network so your device does not reconnect automatically during field deployments.
2. Accessing the Configuration Webpage
- Open a web browser on your connected device.
- Navigate to:
- The embedded configuration portal will load:
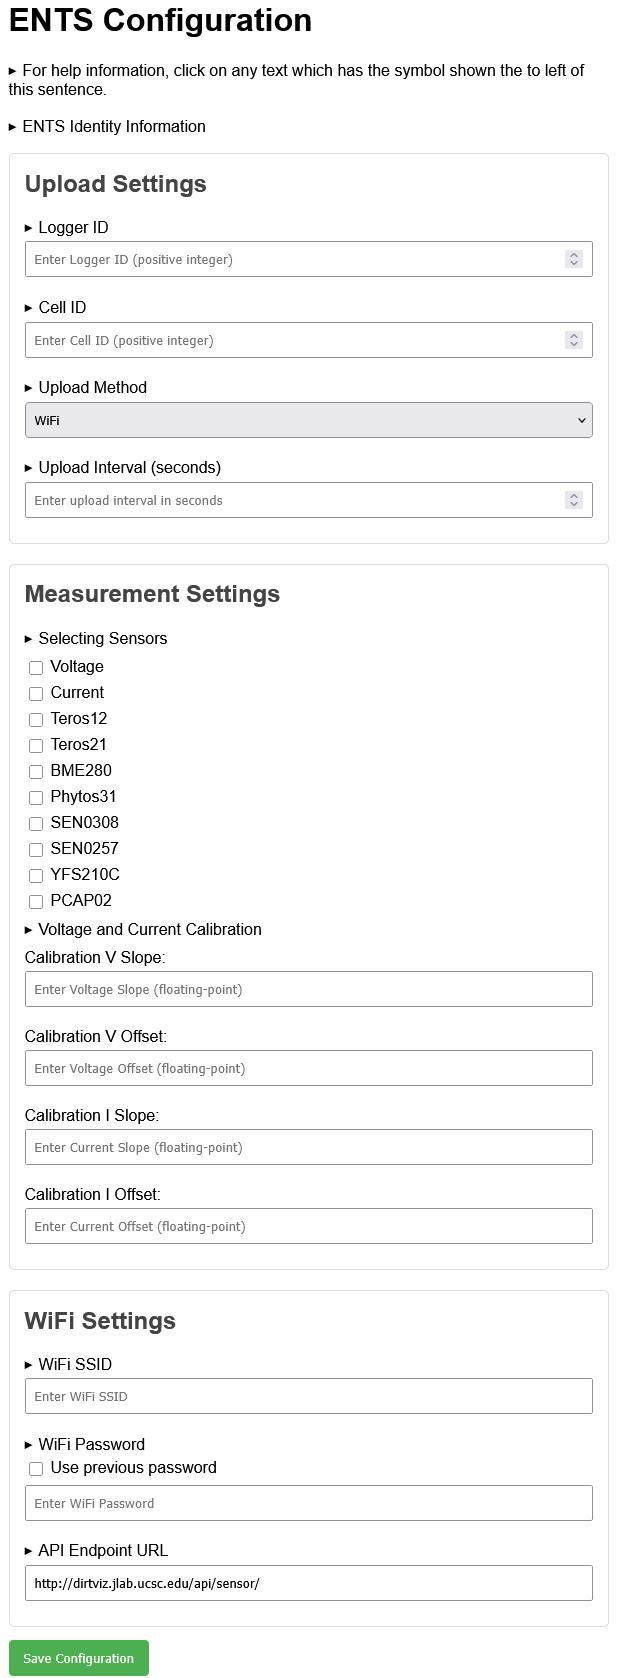
http://192.168.4.1. Use this form to assign your Logger ID, Cell ID, measurement frequencies, and upload method (WiFi or LoRaWAN).3. Entering Configuration Parameters
Fill in the required configuration fields:
Identity Fields
- Logger ID: Enter the numeric Logger ID obtained when creating your device in DirtViz (see DirtViz Web Platform).
- Cell ID: Enter the numeric Cell ID corresponding to the physical deployment site created in DirtViz.
Telemetry and Transmission Method
Select the upload method based on your deployment environment:
- WiFi Mode:
- Select
WiFiunder upload method. - Enter the local WiFi network name (SSID) and Password.
- Enter the target DirtViz ingestion endpoint (defaults to
https://dirtviz.jlab.ucsc.edu/api/v1/). - LoRaWAN Mode:
- Select
LoRaWANunder upload method. - Ensure your device DevEUI, JoinEUI, and AppKey match your registration on The Things Network (TTN) or local LoRaWAN gateway.
Measurement Timing
- Sampling Interval: Configure the measurement cadence (in seconds) between sampling cycles.
- Transmission Interval: Configure how often aggregated measurement packets are uploaded.
4. Saving and Rebooting
- Click the green Save Configuration button at the bottom of the page.
- The web interface will confirm that settings were written to onboard non-volatile memory (EEPROM / NVS).
- Follow the onscreen prompt to reboot the board: press the white RST button located near the corner of the board next to the USB-C port.
- Disconnect your phone or computer from the
ents-XXXXXXXXWiFi network. - The board will now transition into its programmed sensing and transmission duty cycle.